How to Install a New Linear Shower DrainDo you know how to install a new linear shower drain? In recent times, linear drains have been slowly attracting interests from some homeowners. They come in proper design flexibility and low profile, making them perfect for any remodeling project. In such situations, it is important to learn all there is to know about installing linear shower drains.
Now, let us look at the different tips to keep in mind and the errors to avoid when you finally purchase a new linear shower drain! Conducting Proper Preparation before Installation The first step to take before installing your linear drain is to make sure that you are up to date with the local plumbing requirements or codes. You should also check the condition and quality of the product before fixing it on your shower wall. Ensure that all the accessory items and the components are ready for installation. In the case of any replacements, contact the store from where it was bought. Once you have identified that the product is within your specified requirements, return it to its original package. When you are ready to install it, then you may remove it from its pack. It is also necessary to handle your linear shower drain with the proper care and maintenance which it deserves. The sole purpose of this is to prevent it from damage and also to protect its finish. Follow the care and cleaning manual for well-detailed maintenance tips. What Materials And Tools Do You Require? After conducting proper preparation, the next step is identifying your ‘tools of work.' A lot of indoor home projects and installations rely heavily on using the appropriate materials. For instance, while remodeling your home, choosing the best bathroom window designs is crucial. The same case applies when it comes to installing a new linear shower drain. We have found out that the following tools should help you fix your linear drain quickly:
Above are some of the crucial tools needed during the process. However, here there are no limitations and your level of imagination can go a long way in helping you settle on the right tools to use! The Process of InstallationWhile installing your linear shower drain, you need to follow certain guidelines or instructions. We have managed to identify the key issues that you are required to follow carefully. Remember here that simplicity is our primary objective!
1. Choosing The Right Placement Location While installing your linear shower drain, we have identified ideal locations. Fix your shower drains in either of these sites: at the edge of a wall, along with the doorway or even somewhere at the center. 2. Locating The Waste Drain Piping System Make sure you linear drain is in line with your rough-in piping system. In such situations, we advise that you re-locate your waste drain pipework. 3. What About The Cutout Hole For The Drain? Here, you are required to identify the location of the marked pipe. Afterward, cut out a three and a half inch hole. To be more exact, locate placement through the addition of a thick wall substrate, a quarter inch for the highly resistant polyethylene membrane and also, a thick tile or stone. 4. Pre-Install The Linear Shower Drain To ensure that you have correctly placed the linear drain. It is necessary to also pre-fit the drain onto the plumbing waste line. If you have correctly set the pipe, then you may remove the elongated conduit body. 5. Installing The Moisture Cleavage Before installing the mortar bed, it is first essential to establish a perfect water barrier cleavage over the wooden floor area. What about when it comes to the concrete floors? Here, what you should simply do is wet the slab and then directly apply the mortar mixture on the plate. 6. Installing The Metal Lath Follow the local building codes while installing the metal latch on the bathroom floor. 7. Properly Maintain The Linear Drain Body And Flange Apply masking tape, painters or even clear packing tape onto the linear shower drain body and flanges. Why should you do this? It has come to our knowledge that by doing so, you keep the insides of the drain sturdy. Similarly, the flanges are also kept clean from debris and mortar. 8. Building The Drain Support In this next step, all you need to do is to prepare a slightly wetter mortar bed. It should be more moisture filled as compared to its normal conditions. Then, make a support base beneath the linear shower drain trench. Also, build the flanges of both ends and the back flange just next to the shower wall. 9. Install and Then Connect The Linear Drain Body Fit the linear drain body by connecting its outlet onto the waste line of the plumbing system. In this process, you are required to use a no-hub coupling, and pressing the linear drain body down to the highly moisturized mortar bed. 10. Level The Drain As we conclude on the main steps of installing a complete linear drain in your bathroom, you need to take one crucial step. Here, all that is required is leveling the linear shower drain and packing the mortar beneath the last pipe flange. 4 Linear Drain Installation Tips Which You Should Always Remember
If you are just beginning to learn about linear drains and their installation procedure, here are some crucial points to always keep in mind. 1. Simplified Slope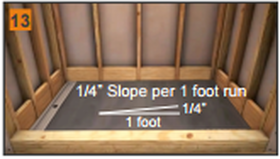
For the traditionally centered drains, slope the mud bed using four directions. We know that the process is tricky, but it can be done! If you conduct the process if a haphazard manner, there are high chances that you might end up with a flat surface area. This means that you will probably have to contact the installer so that he or she may repeat the installation process.
For easier and faster installation, we have discovered a neat trick. All that you are required to do is fixing you linear shower drains in a single slope, facing one direction! 2. Appropriate Placement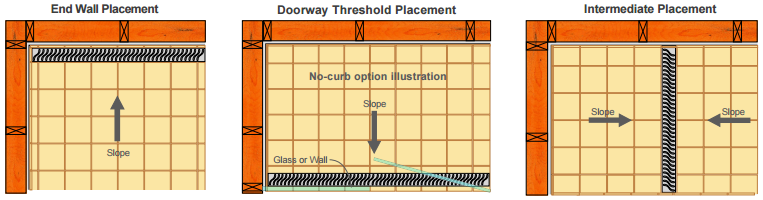
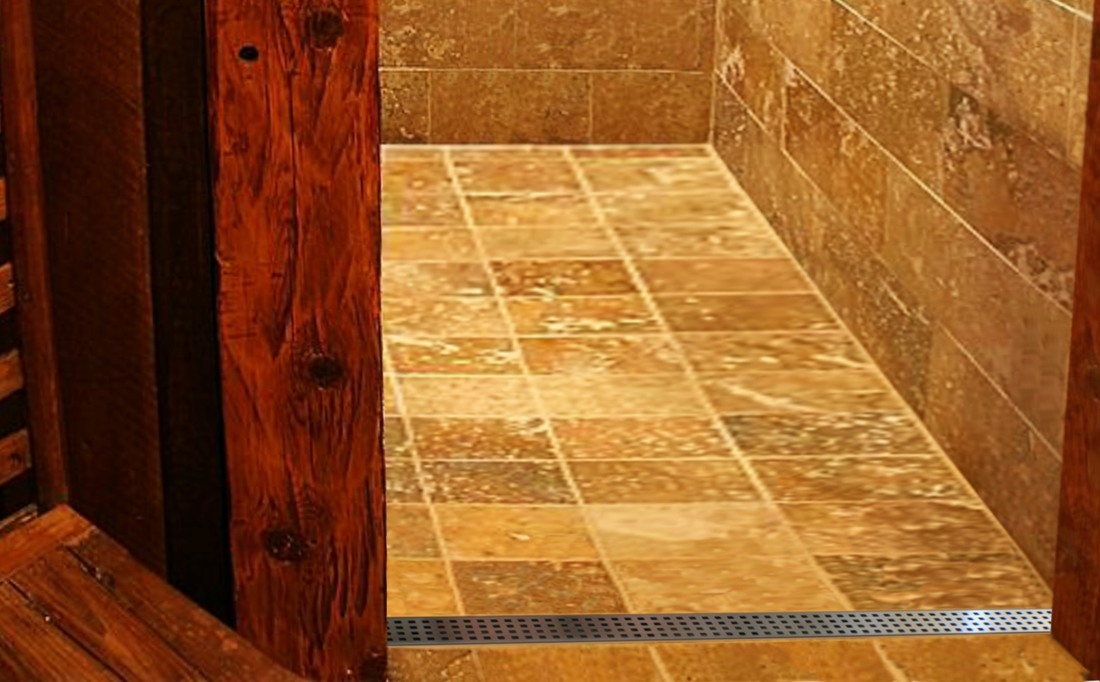
If you have no-threshold or curbless showers, fix your linear drain along the bathroom’s door wall or the wall directly facing the shower door. The slope requirements mean that by installing the linear drain on the opposite side of the door, you end up creating a slip and trip hazard.
3. Length Considerations
When shopping for the best linear drains, you are likely to find them in different shapes and sizes. When it comes to length, we advise fixing the drain either across the entire entrance wall, along with the door war and across the wall directly opposite the entrance.
A linear drain ends up causing water to flood or pool next to the walls and also in the bathroom corners. 4. Flow RatesIn many cases, linear drains emit eight to ten gallons of water every minute. Therefore, designers should not go past that volume when coming up with their shower designs. However, designers have little to worry about when it comes to lower flow showerheads.
Conclusion Having looked at the different linear drain installation tips, you now have a broad range of options. Now, once you decide to remodel your home or when you move into a new establishment, you can make the right home interior adjustments. We hope that the contents of this article have settled any existing queries and doubts. You may now enjoy the fruits of a modern linear drain! Share this article with all interested homeowners and members of the public. Let us know your greatest challenge in installation. What do you feel is the best approach to solving any installation problem? |
|
|
Popular Posts
|

|

|
|
|